Alice in Wonderland Sweet 16

Hey all!

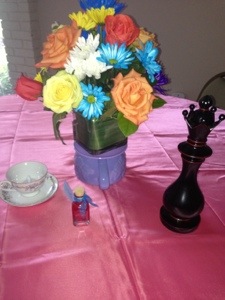
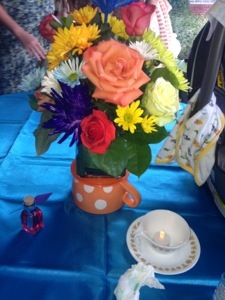
I wanted to do a quick post about some centerpieces that were at my best friend sister’s sweet 16. The only problem that I had with them was the florist said she couldn’t use the giant tea cups as a base. Which in my opinion was a complete lie and she just wanted to charge more. But that’s just my opinion.

20130906-135739.jpg

20130906-135753.jpg

20130906-135805.jpg

20130906-135818.jpg

20130906-135825.jpg

20130906-135832.jpg

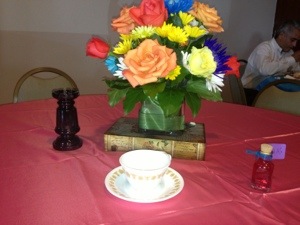
So the original plan was to have 6 theme tables and then the rest would be basic tables. But due to time issues and the birth of a new baby in the family the themes tables did not come along. So they did these awesome centerpieces with flowers instead.

I think that they would have looked way better with the flowers in the tea cups but like previously stayed the florist said no.

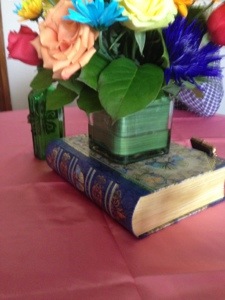
Some tables had old books as seen above in which the flowers sat but not all. It was a nice touch that was added. You could easily hit up retail shops and half price book stores to find old cheap books.

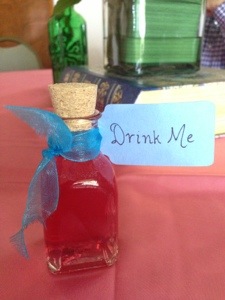
Another thing that I loved was the drink me bottles! I cut the tags out for them with the Cricut on two colors that I thought fit with the theme. I cannot remember what cartridge I used I think Phrases but I am not 100%. Then someone wrote drink me and attached them to the bottles.

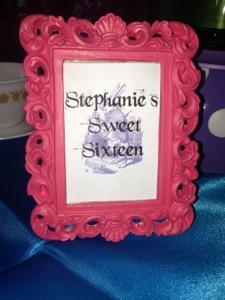
Each bottle was filled with juice and smelled delicious lol. On each table there was also framed picture of Stephanie’s Sweet Sixteen and it had the rabbit from Alice in Wonderland in the background. It was a nice personal touch and the frames were adorable.

Some tables also had chess pieces to represent the red queen! Hobby lobby is a great place to buy big chess pieces. I think they have them year around. I have also seen them at Michael’s and target. You could do a whole Red Queen party there is so much available at stores now! Some tables also had red and black cages. Now I am not a Alice in Wonderland expert but I don’t think bird cages were in the movie but it looked great! Again perfect for the red queen!

The family rented two different color table clothes. Pink and blue clothes were placed on tables through out the room. Personally I would have purple but that’s because I love purple! Lol blue clearly was a great choice because of Alice and pink because hello she is a girl! Bahaha

Anyways overall the table decorations were hard to decide on. They had a lot going on and there were big plans made, but the one who made the plans is the one who had the baby, so they did not come together like planned. But I think the family picked out a great floral centerpiece. It’s absolutely one of my favorites! I love the bright colors and the different type of flowers used.

I want to know what would y’all have done for a centerpiece? I always live hearing people’s ideas!

Hope school and/or work is going week for you all!


Jill

Jungle Baby Shower {Cupcakes: DIY}

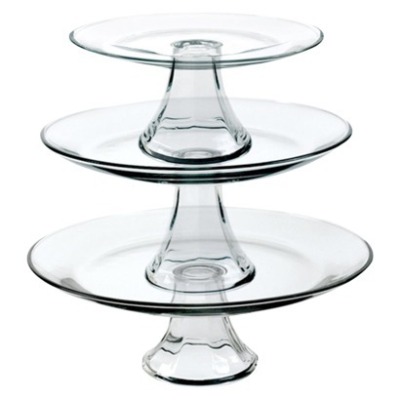
So when having a baby shower a big important part when planning food is the cake! I think when having 15-20 people a cake is the way to go. You do not have to cut the cake into a million pieces with that many people. When you go over 20 people I recommend looking into cupcakes. Cupcakes are so simple people can just go pick them up themselves and do not have to wait in line while a cake is being cut. Today cupcake towers are so popular you can pick one up anywhere. These towers make it easy to display your cupcakes and they are stacked so they do not take up that much space on the table. Here is one from Target that is $19.00 and is three tiers.

Image

These stand can also be used for other food and not just cupcakes like some of the other cupcake stands that have holders and are specifically for cupcakes only.

For our baby shower we had like 40-50 people coming so we got an 8 inch 2 layered cake from a bakery and my friends mom made red velvet cupcakes. We wanted to dress up the cupcakes so we bought gum paste from Michael’s and gum paste cutters for flowers and leaves.

The gum paste comes in white and we used Wilton Gel Food Colors to dye the gum paste: green, blue, and yellow. We used two different sizes of the flower cutter and did the smaller flower in yellow and the bigger one in blue. As they there being cut we curved them upwards and have them dry like they were a cup. Then we took the green gum paste and cut the leaves and curved the edges upwards to dry. After the flowers were dry we took a brush and dipped it in water and brush some water in the middle of the blue flower and on the yellow one brush some water on the bottom. Then stick the two together. When gum paste becomes wet it becomes very sticky and you can form things together.

Here are some pictures of the gum paste flowers:

IMG_1920IMG_1921


We then iced the cupcakes with cream cheese icing, which we dyed orange, blue, and green! With each cupcake we placed a flower with 2 leaves. The leaves we had in two sizes; one was larger than the other. We bought some plastic animals which I believe were the Wilton cake brand. We then placed them on the tower. Here is the final results:

download

IMG_2862 In the end the baker wanted to charge $3 per cupcakes and we needed 2 dozen so it would have cost us $72. Making them on out own we spent $20 on gum paste, figures, cupcake liners, cake mix, cream cheese, and powdered sugar! Great deal if you ask me 🙂

Next time you have a party don’t be afraid to bake your own cake or cupcakes! With some practice you can create gorgeous cakes and save a pretty penny!

Until Next Time,

Jill

Jungle Baby Shower- Glitter Animals DIY

So one thing I enjoy doing is planning party. In my future I could see it being a nice little side business. This summer I had 3 parties to plan. In May I helped my best friend, Vanessa, plan her sister’s baby shower.

Her sister is a wildlife and fisheries major and absolutely love animals this made the decision on a theme very easy: Jungle. This was our second baby shower that we planned together and again it was a boy lol. We want a girl so we can buy tutus! haha! Anyways we used the colors Brown, Blue, Green, and Yellow as our primary colors for the party

We started the planning process in January but we both are in collage so we did not start actually getting things done until March-April. To get ideas we went on Pinterest and boy are there some awesome ideas! We actually did a lot of things on Pinterest. Looking back on it I think I would have tried doing the projects differently and not exactly like what we had seen. Adding a personal touch to the party makes it unique.

One idea we saw was these little glittered animals. So we went and bought a package of small plastic animals, which actually really hard to find Jungle Animals. I live in Texas so you have a lot of farm animal options available but the jungle ones are pretty limited. In the end Vanessa found them in Michael’s but they were not cheap. Next we bought different color glitters to match our colors. We had green, blue, and yellow. We passed on brown mainly because glitter ain’t cheap haha.

The tutorial we followed used spray adhesive but I hate spray adhesive. It gets everywhere and is just a mess. So we used mod podge that we made (equal part Elmer glue to water). This was a mess too! We put the mod podge on the animals then tried to sprinkle glitter on the animals. They looked awful! I mean awful! They had clumps of glitter and just looked like they were melting plus you could see most of the colors on the animal.

Then I remember a glitter heels DIY I had seen on Pinterest. For the shoes they actually put the glitter straight into the mod podge which makes sense because mod podge dries clear. So we knocked off the clumps of glitter and did it this way and it worked! I think we ended up doing 3 coats before we were happy they turned out great! And with the mod podge you DO NOT have loose glitter everywhere because the glitter was completely coated in the glue. I will post my directions below but first here is a picture of the end results:

IMG_2877

DIY Glitter Animals: What you need:

  • Plastic Animals
  • Glitter
  • Mod Podge
  • Paint Brushes (old ones that you don’t mind ruining and one for each glitters)
  • Plastic Cups  ( 1 for each different color glitters)
  • Newspaper or a Drop Cloth

Steps:

  • On your table lay out the newspaper or what ever you want to use to protect your work area.
  • Next pour some mod podge into each cup and to add the glitter. I like the mod podge to be completely glitter almost like it will be chucky with glitter but don’t make it chucky otherwise your animals won’t be smooth.
  • Mix the glue and glitter.
  • Take the animal and paint a coat of the glue and glitter mixture.
  • Set to dry. While one dries move on to the others.
  • Let the animals dry almost completely before adding another coat. I would do 3-4 coats on each animals. This would give you a nice coverage.
  • And that is it! Very easy!

We placed these animals around on tables including the table where the guest signed in. It is a small simple decoration that adds a lot to the look. They are adorable and I believe they will be used in Baby Jacob’s Room! Next time I would probably get the animals a little bigger but we worked with what we had and it paid off! I used the same method for the centerpieces for my grandparents 50th anniversary party, but that is a story for another time!

Anyways I have to run I was just told I need to find a better shirt for the family picture haha.

Hope you all are well!

Much Love

Jill

Some Cheaper Alternatives

So if you can’t tell yet I enjoy saving money! My best friends little sister is having a sweet sixteen the weekend after my grandparents 50th anniversary party. For the party the theme is Alice In Wonderland & they have 21 tables to decorate. They decided to have 6 theme tables such as the red queen, white queen, the mad hatter, etc but they have 15 more tables to decorate and want to do it pretty cheap.

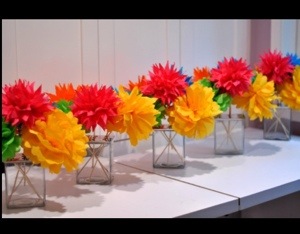
Now I love flowers. And fresh cut flowers are beautiful but they are also really expensive. A cheaper way to do flowers especially for an Alice in Wonderland party which whimsical is great is Tissue Pom Flowers! Like these:

20130723-100425.jpg

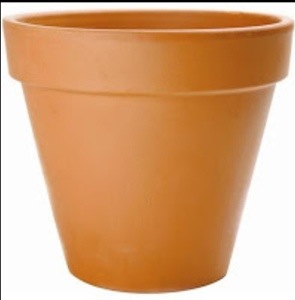
My suggestion for this party would be make a “bouquet” of Pom flowers and instead of glass vases which can be pretty expensive I would use terra cotta
Pots like these:

20130723-100834.jpg

You can make them, stick Alice in wonderland stickers, put playing cards on with pod modge, really anything!

For each bouquet I would do them in theme colors such as: light blue and white for Alice; red, black, and white for the Red Queen; orange and purple for the Mad Hatter; purple and pink for the Cheshire Cat; white and silver for the White Queen.

I would insert a piece of foam into the pots and stick the “flowers” in them. To had an extra flare and to customize them a bit, I would use my cricut and cut out the birthday girl name and “16” and put them on a stick and place them in the pot too. This will add some height to the pots. There is also this really cool classic Disney cartridge I would get for the cricut and cut out the Alice in Wonderland characters! You could do so much!

My greatest tool when making a party beautiful and unique is my Cricut machine! You can do anything with it.

Today I am meeting with the mom in charge of the party to give my suggestion so maybe soon I will have a tutorial to share with y’all!

Hate to cut the post short but I just saw the time and I am late for an very important date!

😉


Jill

50 Years of Marriage

So a little fact about my family is that in September my grandparents are celebrating 50 years of marriage!!!!

50 YEARS

Sadly in a few years that will be unheard of and even today it is very rare so of course we are having a PARTAAAY! Due to family scheduling we are having it next month and it will be great.

Now for a little fact about me: I LOVE TO PLAN PARTIES!!!!! Love love love! I consider myself very creative so I enjoy making beautiful things for parties! Today my step mother and I worked on center pieces and they are a work of art guys! I can’t wait to share all the pictures with y’all but it won’t be until after the party.

My grandparents know about the party so it is not a surprise itself, but we aren’t telling them a thing about the planning and what it will look like so I can’t risk them seeing the pictures on this blog haha. And let me tell you they are fishing for information!

Gosh what has happened to patience and surprises lol.

What I will tell you about is this other great deal I got today!!! Sadly it’s not another awesome eye shadow palette haha. Today it was for something that anyone planning a wedding, 16, baby shower, etc. would love!

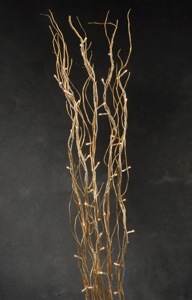
I got me some lighted willow branches y’all! Lol! They look like these below

20130721-225835.jpg

I got this picture from save-on-crafts.com

On that website it $9.00 for 5 branches which is a great deal but I did even better 🙂

I went to garden ridge craft and decor store and found them half off so we got them for $4.99! It was a great day to run into that sale because it was exactly what we wanted!

Seriously isn’t that just the best feeling ever when you got shopping for a specific item and when you find it’s on sale? Maybe I am just cheap lol! But seriously I love me a good deal!

I think that anyone on any budget can throw an amazing party! The key is to plan early so you can shop around. Really we could have saved even more money if after Christmas we had been thinking, and went and bought gold floral that was on sale in January! But none the less we didn’t think that far ahead. We could have gotten things for 50-70% off (it bugs me still).

If you are planning a wedding or a sweet 16 and you have the time plan ahead! Just because you buy stuff on sale doesn’t make it a cheap looking party, you just get to spend more money somewhere else.

Back to the branches (sorry for my rant haha), the branches are for the centerpieces and they look amazing! They could be used for many things not just centerpieces. I think for a evening/night wedding I would take a bundle which is of 5 and wrap the ends with ribbon and attach them to the side of the chairs that line the isle! Well make sure they are battery operated first because otherwise you would have cords all over the place and I know with my family someone would trip.

What would y’all use the branches for? I am always interested in hearing people’s ideas!

Tomorrow I am spending the day with my Cricut machine lol. I have a lot to cut for the party and might as well get started! I may even post some sneak peak photos of the decoration (partially because I am so excited to share lol)

Again I recommend everyone to check out sales, clearance, close out sales, discount stores, etc! Saving money is fabulous haha!

I hope you all are well until tomorrow,

Jill